Setting up JOAN
Once you have CARLA running, the hard part is over. JOAN is a relative walk in the park, except perhaps for setting up a project repository if you have little experience with this.
JOAN is maintained in a GitHub repository by a team of contributors. There are a couple of ways through which you can download JOAN:
- You can download a zipped copy of the repository (note: you don't receive any updates when we change the code)
- You can fork the repository on GitHub (see instructions to fork here). This allows you to change JOAN to your
liking, contribute to the main repository, but also keep track of your changes on your own
gitrepository (recommended for TU Delft students). - You can clone the JOAN repository directly using the command
git clone. However, if you do not have write permission to the repository, you can't make your changes and store them on a repository (well, not easily).
We will explain how to create your own project using PyCharm. + Fork JOAN on GitHub (fork gives you more independence in changing JOAN for your particular project). See these instructions on how to fork JOAN on github. + Once you forked JOAN, you still need to clone your own forked JOAN project); just make sure to change the URL of your forked repo. You can either use the command line or through PyCharm (when creating a new project):
git clone <URL TO YOUR GITHUB JOAN REPOSITORY>
cd <DIRECTORY OF YOUR REPOSITORY>
When using PyCharm: If PyCharm automatically opens an existing project that is not yours, close the project (File → Close project). A welcome screen should appear. In
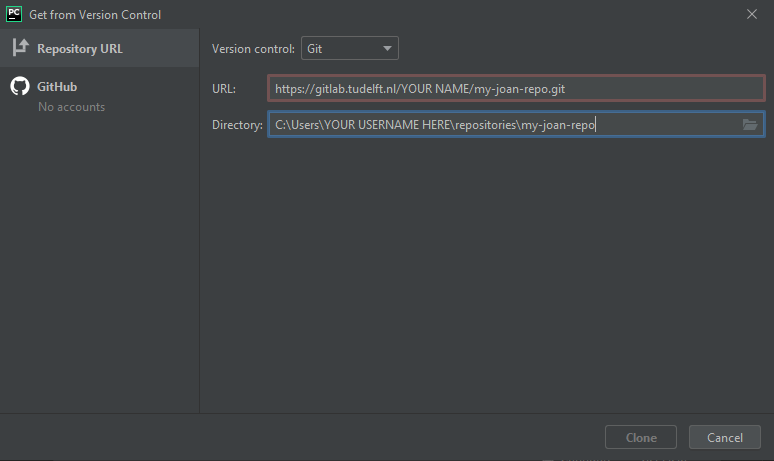
the 'Welcome to PyCharm' window, click on Get from Version Control. A new window appears:
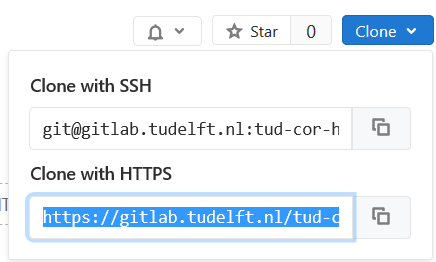
 Go to your own repository's webpage (on GitHub), click
 clone, and copy the URL under 'Clone with HTTPS':
 TU Delft students: Paste the repository URL in the field that says URL in the PyCharm window. Change the directory to
 C:\\Users\<YOUR NETID>\joan-projects\<YOUR PROJECT NAME>
. Replace <NETID> with your NETID if you are on a TUD computer or your Windows username and <YOUR PROJECT NAME> with the EXACT name of your GitLab repository project.
- In the terminal type the following commands in this order (or copy it, and right-click paste in the terminal,
ctrl+vdoes not work). This adds the original JOAN repository as upstream, enabling you to pull the latest version of JOAN.
git remote add upstream-joan https://github.com/tud-hri/joan.git
git fetch upstream-joan
git pull upstream-joan master
- You also need to set your user name and email address for your repository:
git config --local user.name "YOUR NAME"
git config --local user.email "YOUR EMAIL ADDRESS"
-
We prepared a map and other assets to test CARLA + JOAN functionality. Download the assets here, extract it, and copy the contents to
C:\carla\Unreal\CarlaUE4\Content\Carla. Check whether you added the vehicle 'hapticslab.audi' to CARLA's vehicle factory (see here for instruction, under ### Step 7: Adding vehicle assets to CARLA in Unreal) -
We recommend setting up a python virtual environment for JOAN (note: use python > 3.6). In a terminal, navigate to the Joan directory, and execute:
python -m venv venv
- If the environment is active, you'll likely see
(venv)before each command line. If not, run the following command (assuming Windows):
venv\Scripts\activate.bat
- Install the dependencies using
pip(see step 4)
pip install -r requirements.txt
-
Copy the CARLA
.eggfile to the folderjoan/carla_pythonapi(see steps 4 and 5 here) -
Check what modules you want to include in
main.py, and executemain.py.
python
main.py
!!! Tip To retrieve the latest version of JOAN:
commandline git fetch upstream-joan git pull upstream-joan master
!!! Important conflicts may occur when pulling the latest JOAN version. These conflicts are between changes you made and changes in the main JOAN code. Often, these
conflicts can be resolved through PyCharm, but sometimes it is more difficult than this. If you're used to git, resolve all conflicts by yourself. Else, perhaps good to ask your
supervisor.
Adding your own CARLA map
These instructions are specifically written for TU Delft students but are useful for others too.
- Create a folder with the name
<YEAR>_<NETID>in the directoryC:\carla\Unreal\CarlaUE4\Content\Research\(create the folderResearchif it does not exist). - Download the template map here, extract it, and copy the folder called
Mapsit in your own folder underC:\carla\Unreal\CarlaUE4\Content\Research\<YEAR>_<NETID>\. - Open the Epic Game Launcher (you might need to log in; use your login of choice).
- Launch Unreal Engine, top-right corner (Unreal should be installed; if not, restart the Epic Game Launcher or reboot the computer, this normally works).
- In Unreal Engine, CarlaUE4 should be listed under 'Recent projects'. If not, open the
CarlaUE4project (browse toC:\carla\Unreal\CarlaUE4\and openCarlaUE4.uproject). - The CarlaUE4 will now start; this may take a while if you start it for the first time.
- To open your level, click
File→Open leveland selectDebugMap.umapin your folder (navigate to your 'Research' folder!) - If you want, you can rename your map to a more descriptive name (right-click on the map in the editor →
rename, for example,<YEAR>_Map_<NAME>_<SHORT DESCRIPTION>, or useFile→Save as). - Your level will load, but this may take some time.
- To run the Unreal Engine, hit the play button.
Warning
Make sure to load your map, so double-check that you are in the right directory when opening your level!