Module: Experiment Manager
The Experiment Manager is used to define experiments consisting of experimental conditions. Once these are defined, the Experiment Managers can automatically transition between conditions. It thereby automates the process of running the experiment. This prevents manual errors in resetting the driving simulator and in loading the correct settings for a specific condition. All conditions consist of a specific set of settings for the included modules. Examples of these settings (and thus parameters that you can vary in conditions) are the spawn points of vehicles, the gains of a haptic shared controller, or the velocity in cruise control mode. In summary, with the Experiment manager you can:
- create or modify an experiment,
- add conditions to the experiment,
- select the conditions you want to run in your experiment,
- set the order of the conditions, and
- customize each transition between conditions (such as respawning cars and traffic).
The Experiment Manager has two main components: conditions and transitions between the conditions. We will describe how to use them below.
How does the Experiment Manager work?
The Experiment Manager stores and sets the settings of all modules that are relevant for your experiment. Each module has its own settings. For example, the settings of the steering wheel controller module contain the current values of the controller gains.
When running an experiment, per condition, you may want to change these settings. The Experiment Manager checks the current settings of the controller module and sets the value that corresponds to the condition you want to activate and run next in your experiment. The opposite happens when you are defining your experiment: you change the settings of each module that you want to change for each condition. The Experiment Manager recognized which settings you changed and stores these changes.
An Experiment consists of a set of base settings, and every Condition stores the changes that have to be made to these base settings for that specific
condition.
The experiments are stored in a JSON file, which you can open in any text editor to check whether your experiment and conditions are to your liking. You can also alter these files to make changes to your experiment in a text editor.
Contrary to all other modules, the Experiment Manager has no state machine and own process. This is because the Experiment Manager does not run anything, it merely sets all settings for you to streamline your experiment.
We've prepared an example_experiment.json file, which contains an example experiment. We added three conditions in which we change the hardware input controlling a car in CARLA, change the settings of the hardware input (a keyboard's sensitivities to steering), and add another vehicle in CARLA.
How do I use the Experiment Manager?
0. Loading an existing experiment
Once you are done creating your experiment, you can save it and load it at a later stage (hit the Load experiment button).
1. Creating a new experiment
Creating and editing experiments can only be done if all modules are in the initialized state. This is because in that state all module settings are fixed. So
to create a new experiment, first set all modules to the settings you want to be the base settings of your experiment. Now click initialize in the JOAN main
window, after which the Create Experiment button in the Experiment manager becomes available. With this button, you can create your new experiment. You have to specify which modules to include in your experiment. Modules that are excluded will work but are not affected by the experiment manager. So you have to set their settings manually. Finally, you need to specify a name and save-path for the *.json file.
2. Creating conditions
Now that you have your experiment, you'll need conditions. This works in the same way as creating the experiment. So the first step is to move all modules back
to the stopped state by clicking the stop button. Now alter the settings of the modules such that they represent your condition. Finally, click the initialize
button again to fix these settings and click the create new condition for current settings button in the edit experiment dialog. Repeat this process until you
have created all conditions. Conditions cannot be altered once they have been made. You can delete them and create new ones. You can view the changes compared to the base settings of an experiment by double-clicking a condition in the edit experiment dialog.
The only exception to this method of creating conditions is the data recorder, please see the note's on using the data recorder below.
Important
Do not forget to click the save experiment button before closing the edit experiment dialog!
3. Creating Transitions
Transitions are used in-between conditions to execute any code you want. To create a new transition you have to create your transition class that inherits
from the Transition class. If you place it in the folder modules\experimentmanager\transition, it will be recognized by the experiment manager automatically
. You can have a look at the SimplePrintTransition class as an example, if you want to you can copy, rename and alter it and start from there. Transition
classes have two implementable methods that are called before and after the new condition settings are applied.
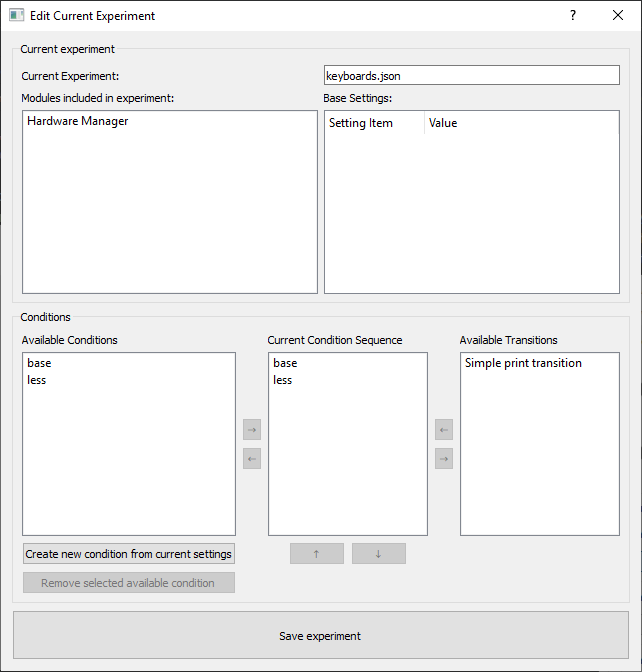
4. Define the flow of your experiment
Finally, you need to define the flow of your experiment, this is done in the edit experiment dialog which is shown below. An experiment consists of a sequence of conditions. Transitions can be added in between optionally. All conditions and transitions can be used multiple times in one experiment. The center list in the lower part of the dialog shows the current experiment sequence. Add or remove conditions and transition with the buttons beside this list. Change the order by moving elements up and down with the buttons below.
Important
Do not forget to click the save experiment button before closing the edit experiment dialog!
5. Running the experiment.
To run the experiment, close the edit experiment dialog and make sure all modules are in the stopped state. You can manually select and activate a condition by
clicking the Activate condition button (only when JOAN is in "IDLE") Once the condition is active, you can cycle the state machine like you normally would. When you click the stop button,
the experiment manager will automatically transition to the next condition if the Auto transition after stop checkbox is checked. You can also manually
transition to the next condition by clicking the Transition to next condition button. Transitions are called when moving between subsequent conditions.
Transitions at the end and the beginning of the experiment are also called.
6. Changing the condition order for different participants
Often you want to change the order of the conditions for different sets of participants to account for order effects in the data. The best way to do this is to copy the experiment JSON you just created (rename them accordingly). Then, open the .json file in the text editor of choice and change the order of the conditions and transitions under "active_condition_sequence.
Using the DataRecorder with the ExperimentManager
You can include the data recorder in your experiment to make sure the right variables are saved in every condition. Remember that the data name is also stored as a setting so it can, and should, be different for every condition. Otherwise, you have to reverse engineer which file is which condition by the timestamps. You can either change the name of the file depending on the condition or make separate folders for every condition.
Remember that the data recorder save path is set in the stopped state, like all other settings. But the variables that are stored are selected in the initialized state, this is different from the other modules. So the data recorder has to be set after transitioning to initialized and before creating the new condition. Remember this when creating your conditions.